FINSHED! A bejeweled Kanerva

I love this make.  I really really love it.  (So sorry for the many photos to follow). Do you have clothes that just make you feel great and seem to give you a whole new attitude or is this just me!? So much so, that as soon as I finished it I wore it to the supermarket on Sunday with my Iris shorts. Then I wore it to work on Monday tucked into a skirt (and my gold pour la victoire shoes - nothing like blinging it up for work!) and I'm planning on wearing it on Wednesday night with my jeans for dinner with some friends. Who'd have thought there'd be so much versatility from such an over the top print. And this is probably the most over the top print I own (and in a wardrobe of prints that is saying something!). 
So, first thing, the print. A couple of weeks ago I saw this liberty print on Lizzy House's instagram and I fell in love. I'm not sure how I missed it til now. I immediately bought 1.5 from Shaukat (not realising that it is available at Addicted to Fabric!). Check out the Elisalex Diana did in a different colourway!

The print is Alexandra C, from the Liberty Art Fabrics Collection SS 14,  Gallery of Prints collection by Liberty Art Fabrics.  

A photographic print – the Alexandra fabric design represents the glittering jewels of Liberty’s decadent Jewellery Room.  The Street Level fabric story celebrates Liberty’s eclectic ground floor accessories. Each design pays homage to a different area or department, taking on the intrinsic mood of each individual space. 


The next thing that happened was that I saw Rachel's blouse from week 2 of Project Sewn,  I fell in love with it and popped over to the Named Clothing website to check out the pattern, the Kanerva button back shirt. Et voila, the perfect pattern for the Alexandra fabric.
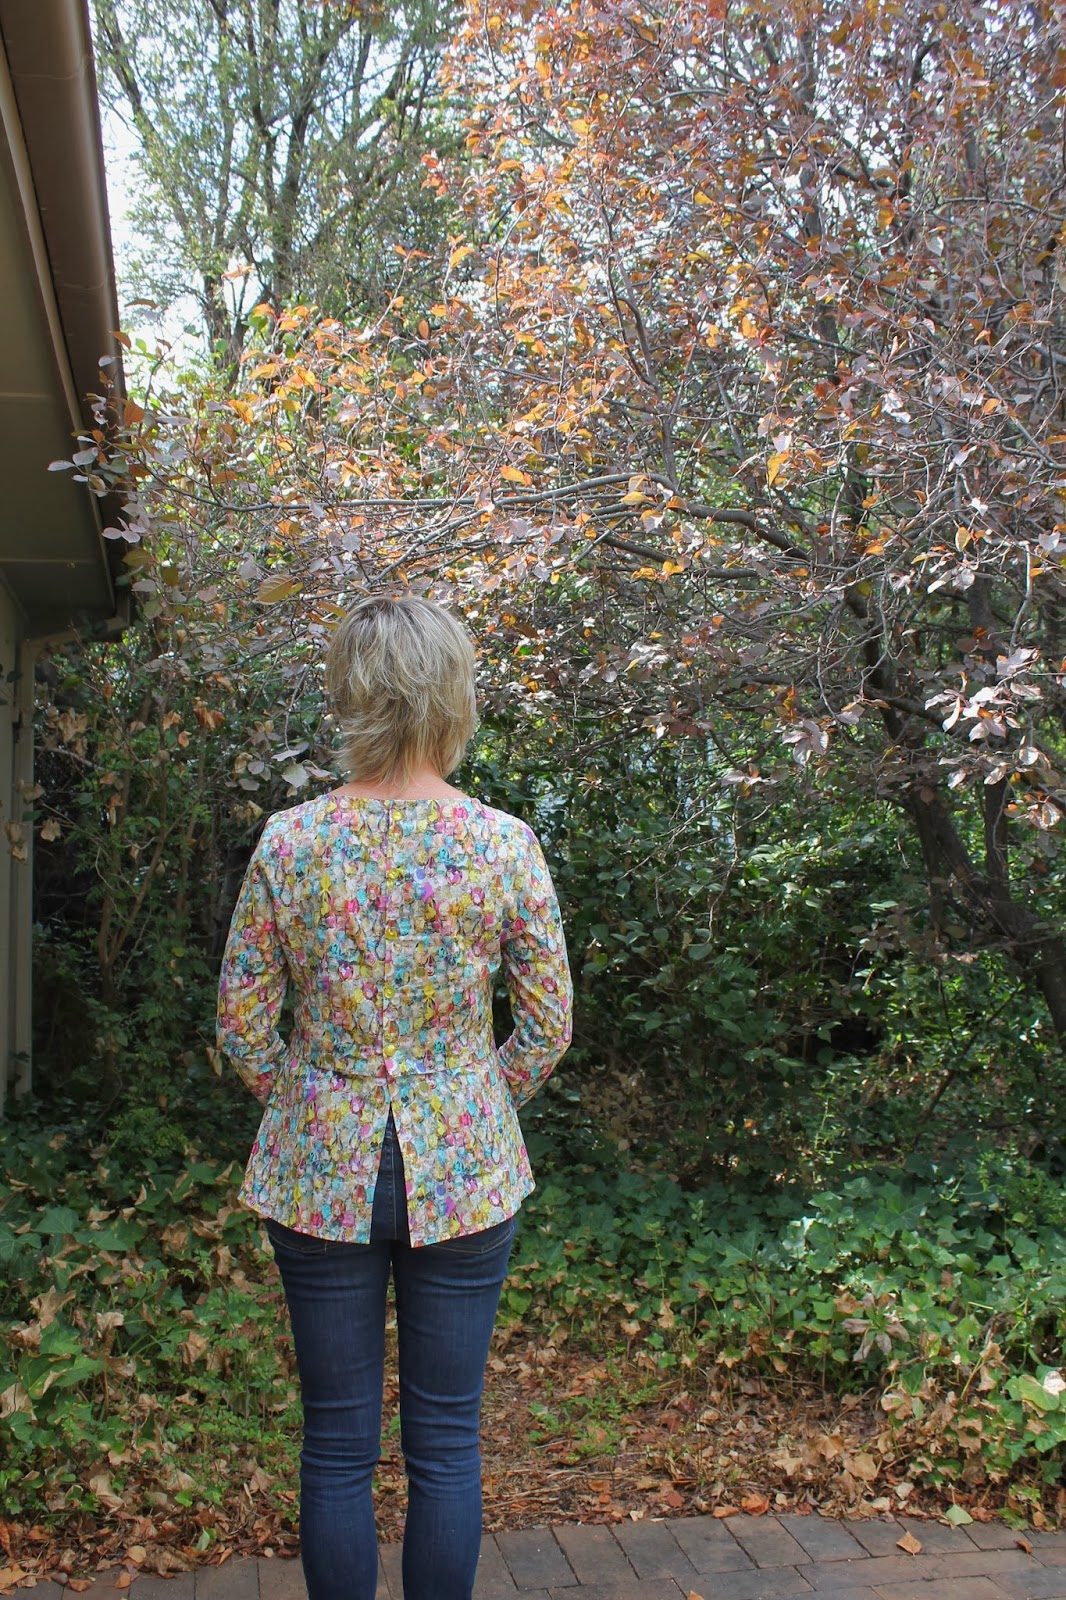
This was my first time sewing a Named Clothing pattern and it was really enjoyable.  I have read that they have made loads of changes since their first pattern range and it shows.  The pattern is pdf but still required tracing (a bit annoying) but it wasn't too onerous as there aren't many parts to this pattern.  The instructions were clear and well stepped out. I love the construction and the way that the peplum has a little fold. 
The neckline is finished with binding, I prefer a facing but no big deal. The instructions suggested the back placket is done and then the neck and hem although I switched this around. I cut a straight 36 but removed an inch from the length above the waist to ensure the peplum sat at a better spot for me.  Otherwise the fit is good. 
The pattern fabric suggestion is: "Prefer an elastic, light or medium weight fabric, so the shirt is easy to put on without opening the buttons". In hindsight I'm not sure whether this means that it should be only a knit fabric and not a woven, but I went with the Liberty tana lawn and despite thinking right up until the last minute that I would need a team of dressers to be able to get into it, it does slip over the head. Not so easily that I would consider forgoing the button up back, but easily enough. 
I had a really great time on Saturday meeting up with a great bunch of Canberra sewers: Jen, Myra, Siobhan, Kylie and Amanda. Jen suggested that wooden buttons might look good and she is right they would look great but I was carried away with the opulence of the print and went for some very bling, yellow buttons that almost look like they could have popped out of the print. 
I think this style is just so flattering and I love that it is so versatile that it can be easily tucked into a skirt or pants. There will definitely be more than one of these in my wardrobe. It really is a fantastic shirt pattern.


FINISHED! A Daydream Carme Blouse

Early in February I was very honoured to be asked to test the new Pauline Alice pattern, the Carme blouse. I jumped at the chance of course.  I am such a Pauline Alice fan girl (having made both the Cami dress and the Malvorosa dress and the Ninot jacket is sitting high on my to do list).. and well a blouse is actually my favourite thing to sew.  Knowing that it was a pattern test I probably shouldn't have used one of a Liberty fabrics, but life is too short to not sew with beautiful fabrics and mistakes are so well hidden in a Liberty print.
More on the fabric later, but now to the most important part, the pattern. It is gorgeous isn't it! There is so much to love about this pattern. The pintucks on the front bib, the button cuffed sleeves, the rollup tabs and the stylishly slim fit, allowing it to be worn out or tucked into skirts.   
I cut a straight 36 with no adjustments at all.  The pattern comes together well (I love the way you pintuck and then cut the bib) and the sleeves set in perfectly. Pauline provides good instructions but she has also produced some video tutorials to assist even a beginner sewer, so there is no excuse not to try it. The pattern has also been updated to include a fabulously easy way to attach the collar which I'll be using for my next make.
I have worn this top already many times since making it.  Just a couple of things I'd take more notice of next time...  The instructions give you the option to interface or not the collar, so I took the middle ground and only interfaced one side of the collar. In hindsight the collar would have sat better, in this fabric, if I'd interfaced both sides.  
Sadly, in testing I made a small error and can't quite get my collar to do up with the buttons I have which is annoying and I couldn't find any slightly smaller buttons that I like. As a result when I got to the buttons I had a bit of a hopeless moment..first, I thought I wouldn't put any buttons on it. Then I thought 3 and the opening, then I thought more,..but by then I'd cut the button holes and the amount left at the top isn't exactly even.  Aaah. So annoying, but really, with the buttons undone, which is how I wear this top, it isn't at all noticeable (thank you busy Liberty fabric).  But my next one I'll get right as I'd love to be able to wear it all done up.  

Lastly, inserting the bib into the front requires precision and spot on top stitching. I need to up the ante next time and use my blind hem foot or something to provide guidance for immaculate top stitching so I'm not tempted to keep unpicking a less than perfect result. 
Despite those little things, I really enjoyed making up this pattern and look forward to making it up again in a denim/ chambray. For an amazing version, go and see Merche's version. It is stunning and then go and buy the pattern here!

Lastly, back to the fabric.  I bought this fabric from Tessuti after being lured into purchasing it from Velosewer Maria after spotting her purple colourway on instagram.  No regrets with the purchase of course.  As soon as I saw the line drawings from Pauline I knew this fabric would become a Daydream Carme Blouse.  I am a big fan of the work that Mo Coppoletta did for Liberty last season having made the Cami dress out of his Joy and Sorrow print and still have some Growing Fonder in the stash.
Daydream is from the AW 13/14 season and is hand painted by Mo Coppoletta who was inspired by William Morris and the Arts and Crafts movement, a style that represents Liberty, as it is a Mecca for Arts and Crafts visuals. Peonies were chosen as they are known as 'the king of flowers' in Eastern tradition and defined as the flower of riches and honour bringing health, wealth and wisdom. 


FINISHED! A Lurex mini challenge

Back in January, when I was at the Fabric Store, Emma from Ernest Flagg and I both bought 1.2m of this fun lurex. It is quite sheer and has a very subtle sparkle to it which I failed to capture well in these photos. It was an impulse buy and not particularly well thought through as I don't often wear grey. I love it on other people it is just not a colour that I love to wear (sequins aside).  But caught up in a moment of lurex, at the time I envisioned a little top to wear with jeans, but later decided that it might be fun to make into a dress.
Following on from my success with the Saiph Tunic and knowing that this pattern (sans sleeves) requires, with a good width of fabric, only 1.2 metres I decided to make the Saiph up again. To my own detriment, it's not often that I make up a pattern more than once and certainly not in such quick succession, so it did feel weird to return so quickly to this one.  Last time I made up the XS but this time I made up a straight XXS.  It fixes the armscye problems of the last one without sacrificing the lovely trapeze look.The dress still slips around the shoulders a bit but no big deal.
Those big dots on the back of the fabric are in fact large raindrops that started to fall as I was taking these photos not imperfections with the fabric although there was a few on the fabric which I needed to be wary of as I cut.  I lined it in a cheap dark navy slippery fabric which works a treat.  Despite being able to slip it straight over my head I kept the back seam and added a self covered button at the top.
I wonder whether I should have made up the other version of this pattern with the straight bottom, but there is no point regretting my choice now.  This is such a cute tunic that it might get a wear for a date night although I need to settle on the accessories. Not sure if these tights and shoes work 100%.
I wonder what Emma made with her fabric? Go over and check out her make.  I can't wait to see what she made! I've really liked doing this challenge.  As for the Saiph tunic, I'm done with it for now but it has definitely been fun! 

Dreaming of a hanging chandliers dress


This week I've been busy pattern testing for one very talented lady.  I have no new makes to show you, but the pattern released hopefully later this month will be worth the wait! I finished up yesterday, so now I need to get back on and  finish my Lurex Mini Challenge by Valentines Day.  I had thought that I might be able to wear this to a wedding in March, but sadly I don't now envisage this as being my wedding outfit.  It's more of a cute little date night piece.Maybe!? When I went to buy lining for it on Saturday I must admit that I didn't buy the expensive lining option as I'm doubtful of how many wears it will actually get.
Photo courtesty of Tessuti
On the other hand, Colette just listed a whole lot of silk on the Tessuti online fabric store. The TEMPTATION! I am in love with the Hanging Chandeliers.  

Has anyone else succumbed to any of this new silk!?  

I have been dreaming of dresses that I could make with it. I'd love to make a long sleeved dress with it but then I get just a little bit frightened.